Friday, December 31, 2010

TriBSA Update

I'm feeling a little in over my head with the tuning of this motor. I've decided to scale back a bit, start with a solid running, fine tuned, Pre unit engine and make it fit the frame. Tricking out the engine will come, possibly on the second 650 motor I have cases for. That way I can do the heavy mods and possibly do billet con rods new crank and do it right from the ground up. It's going to take a lot of time and money - both of which I don't have much to spare at this moment.

This morning I took my barrels over to a local machinist who specializes in performance engines. My neighbor Woody knows him from way back and is having him do the total engine rebuild on his A10. I am having the one hole in the engine case repaired (its right where the dynamo attaches. They are also boring the cylinder out to fit the .06 oversize pistons. Hopefully I'll have those back in the near future...


Thursday, December 30, 2010

Push Rods are in, clearances are set

After wrestling with seating the push-rods into the tappets for another half hour, I finally got them in. I reset all the bolts to 10lbs of torque and set my valve clearances to .05mm inlet and .10mm exhaust. Gaskets are en-route, so once they arrive I can button the engine up, and reinstall it into the frame.

Wednesday, December 29, 2010

Dealing with the known problems

One of the issues I discovered back in the summer right before I parked this project, was the fork stanchions were mangled and stripped at the top, preventing the fork nuts from catching a thread. I ordered new stanchions but never installed them because right after that I found the sand in the oil reservoir. I laid everything out, pulled the guts out of the old stanchions, assembled the new set but decided new fork seals were in order. I ordered them as well as a handful of other bits I need to finish this bike up. The other issue was in the inlet rocker box. One of the push-rods was not seated on the tappet. I pulled the cover off and found the push rod wedged between the tappet and the base of the tube. There was also a nice gouge in the metal rocker cover which I ground down to avoid rubbing against the rocker arms. These things are a pain in the rear to get back together. The BSA A65 is so much easier to see what your doing. I successfully got the push rod into place but not before the other jumped out. I decided to call it a day since it was getting late and the dogs needed dinner.


Tuesday, December 28, 2010

Triumph Bonneville Update

I bought this bike back in April of 2010. It was advertised as a 99% complete restoration. Powder coating, chrome, rebuilt engine, just needed a seat and a few bits to get it finished. The guy said he needed money and at 2500, it seemed like a steal. I saw it at night and it looked great...

Over the next few days I found chipped and peeling chrome, chipped and "orange peeled" powder coat, areas where grey powder was used without cleaning the black out of the gun leaving a dirty look to the finish etc... After finding the oil reservoir was full of sand blast grit, this project went on the back burner. I tried and tried to flush the sand out of the frame but it just kept coming. This week I've had some time off so I broke down the bike, pulled the engine and did what I should've done from the get go, a complete teardown and rebuild. I flushed the frame with an auto-parts washer at different angles for 24 hrs, than rinsed it with water until I didnt see anything coming out of the frame. After that I rinsed it another 5 times. I quickly dried it with compressed air to avoid rust and it's ready to go.

As for the frames powder coat,I decided to touch up the areas by removing any rust from the bare spots with sand paper, cleaning with acetone, and using some gloss black touch paint and clear coat. Its barely noticeable and I'm so over the fact that this isn't the show bike I thought i was buying last spring. 


Monday, December 20, 2010

using the lathe to make longer fork bushings

This is for the speed twin. I want to compress the forks slightly to keep the frame angle the same with the new 21" front wheel as it was with a 19" front wheel. The lathe is old and i'm still learning how to use it, but this bushing has taken 8 hours to turn so far. It's almost done, but theres got to be a faster way.

Wednesday, December 15, 2010

Removing the BSA A10 swing arm and silent block bushings.

Currently I have two A10 frames in my shop. One is mine for my future TriBSA and the other is my neighbor Woody's. who is restoring his. My frame is the later type which has the hollow swing arm spindle for a right hand side rear brake. Woody's is a 1955 and it is still seized up inside those silent block bastards.

Anyway, I applied some parts blaster around the nut on the right hand side of the frame to help loosen everything up. I removed the nut as well as the small bolt on the left side that holds the flat side of the main spindle-bolt to the frame. I rethreaded the nut to the spindle (just a couple of threads so that there was an inch of thread exposed below it), propped the bikes left side up off the floor with a 2x4 and with a piece of scrap wood as a buffer, I gave it a few sharp taps with a mallet. Eureka! It eased down an inch. I removed the nut and using a spare socket (I believe 14mm was a close match) I tapped the spindle though the swing arm, adding spare 14mm sockets as the spindle sunk deeper and deeper until it popped out the other side. Now the 1st thread on the spindle was a bit bodged up, but I took it to the grinder to bevel it out and the nut went right back on. 

The bushings are two metal sleeves, one inner and one outer, separated by a rubber layer. Using a torch (outside of course) I burned the tip of the swing arm where the rubber was exposed. The rubber soon caught fire and with the continuous flame of the torch the rubber bubbled up and burned out in a few minutes - all from the tip of the swing arm - as the rubber burned off the rubber deeper inside expanded and bubbled out.  after a few minutes I pulled the inner metal portion of the bushing out with some vice grips. I repeated this to the second side. With both inner sleeves removed I torched through the swing arm tube and burned out the rest of the rubber and scraped it out with  metal rod. I kept waiting for the fire company or the EPA to show up as flakes of burning rubber embers were swirling around the ally and toxic fumes from the burning rubber surely offended at least a few neighbors.

The outer sleeves of the silent block bushings are the real bitch. They are two, roughly 2-3 inch long tubes pressed into the swing arm very tightly. I tried using a Dremmel with a cutting tool to score a line across the metal sleeve. The bit wore out before I got too far. I ended up spending the next hour and a half swearing sweating and breaking tools (2 files a hack saw blade and two screwdrivers, but I finally got a couple of cuts into the inner sleeve where I could pry it out with some channel locks. Not a pretty job and there's still one more inner sleeve to go. 


Burning just the tips allowed the rubber to bubble up.


With vice grips I pulled the flaming inner sleeve out with ease.


The inner sleeve.


Burning out the excess rubber. I then scraped out the rest.


Voila!


Pulling the mangled outer sleeve from the swing arm.


I really had to butcher the sleeve to get it out.


Next up is Woody's older model with the solid bolt-spindle. This one is really seized.


Sunday, December 12, 2010

all the kings horses and all the kings men...

...couldn't get that goddam bolt out of the swing-arm. Silent block bushings were not the best thing the Brits ever came up with for motorcycle technology.

long term project year 2 TRIBSA cafe racer

I started collecting parts about a year ago for some sort of ground up build. I wasn't sure at the time of what I wanted, only that I wanted to use a triumph 650 pre unit engine in some frame other than a standard triumph frame aka a special. Well after helping my neighbor rescue his 55 A10 from 40 years of deep storage, I started thinking about the beauty of the A10 frame. TriBSA cafe's are much less common than the Triton (which everybody seems to be building these days - most of which are not done very well).  I have a frame and swing arm, a stock oil tank if needed, a possible set of forks, though I'm thinking Norton Roadholders, a massive twin dual lead front brake from a GS750 and a basket case pre unit 650 with trans with an extra set of cases, gear box case and the option of cast iron or alloy jugs. I need to figure out the rear tire, the gear ratio, carbs (thinking going balls-out twin AMAL GP's which will require a different cylinder head) Lucas competition mag and an assortment of engine mods and tuning to make it a road racer aka high compression pistons, race valves and springs race cams etc.... basically anything to make this run well at high speeds. This bike will NOT be a daily rider, but more of a street legal competition bike that eventually will see the track. I need to figure out the rear brake situation. I see a lot of people using conical brakes of OIF Triumphs or BSA's, and some using Norton Commando brakes. I know manx brakes and other super rare and expensive braking systems would be awesome, but short of a really great bargain find, I doubt I'll drop that kind of dough on the rear brake. Something later will be fine with me I have a rear wheel thats period correct for this frame but with the mother of all front brakes, the rear brake I have seems wimpy. As far as styling - I guess it'll all depend on what type of tank I can track down. I could go for a beefed up Goldie look, or more of a Manx style like the botton bike - though I'd probably use a manx seat at that point. The trim is the last thing on my mind right now. I want  performance!


Any advice?

Saturday, November 20, 2010

And now begins the tedious process of cleaning EVERYTHING

Just started bead blasting all the little parts. Looking good so far, but this will take a while.

Thursday, November 18, 2010

Hodaka power washed, ready for paint stripper

Got all my parts laid out on a table. Everything with paint gets stripped and blasted, any usable chrome gets polished or blasted and powdered. Engine will be cleaned and rebuilt. New parts on the way to replace all the unusable stuff. My lift is now cleaned and ready for my bonneville rebuild.


- Posted using BlogPress from my iPhone

Monday, November 15, 2010

Hodaka tear down.

I finally had a chance to tear into the Hodaka I picked up last week and it's been an adventure.

1st glance, the bike looks complete minus the gear shift side engine cover, tail light and coils. Heavy surface rust on most parts.


The surface rust on the forks came up withg a little WD-40 and some light buffing with steel wool.


Good enough for me, I want this to be a rider, not a show bike.


Aircraft stripper  applied to some of the first loose parts that will be repainted. I bought some "early Hodaka red" paint from Strictly Hodaka.


I powder coated the replacement tail light bracket I bought on ebay. So far so good.


Tail pipe had a fair amount of soot inside. I took the outside to the wire wheel to clean off the rust and then gave it a fresh coat of high temp flat black paint. Nice.


Headlight bucket and tabs have been stripped and bead blasted.


Bike is starting to make my garage smell like Parts Blaster. Lots of rusty nuts and bolts. I'm finding that most of these will need to be replaced since their so rusted. For every one bolt I remove successfully, two break.

 New engine cover arrived. Needs some cleaning but looks ok.


The battery must have leaked acid because everything in that area is rotted out. New Battery Box has been ordered.


Every time I tap the bike dirt and rust rain down from parts unknown. It seems like rust is whats holding most of this together.


Dead soldiers.


Tool box is rough, but clean replacements are scarce. I have an Idea for this, more on that later.


The seat cover is amazingly intact, but the foam is dry rotted underneath and part of the seat pan is rusted through. The seat cover is brittle and probably should be replaced with the foam. The pan I may try to repair. You can see one tab needs to be welded back on.


With a sharp blow from a mallet, I knocked the fork bolt (partially unscrewed and sticking up a half n inch) down to loosen the forks from the clamps. Looks like I need a new top clamp now as well. Doh.


Frame down to just the lower fork clamps. Need a special tool to remove those. Hopefully I'll come up with some other way to remove that part. I have to remind myself that there are loose bearings inside the fork neck. Can't lose those....


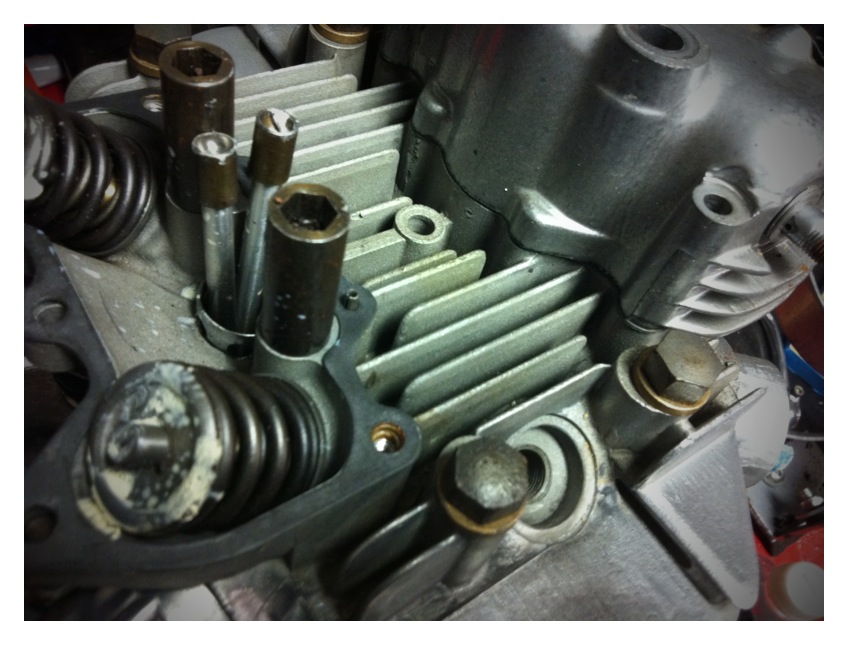
Engine needs a cleaning, but turns over and has compression, I'm hoping for the best but bracing for the worst.


More coming soon.